
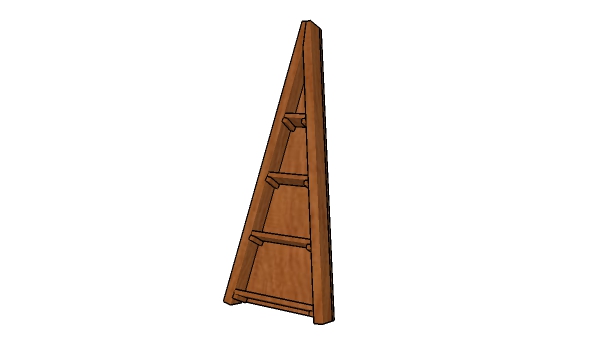
Here is an excellent project for winter months. The first step of the project is to build the frame for the corner planter. As you can easily see in the diagram, you need to make an angle cut to the top of the supports. Use sandpaper to smooth the edges.This step by step woodworking project is about garden vertical corner planter plans free. These simple plans for a simple corner planter with an A-frame shape. If you are into rustic designs or you have some pallet wood you need to use, you should take a look at these plans. You can easily adjust these plans to suit your needs.
Its recommended you invest in the best materials you can afford. Therefore, you should buy weather-resistant lumber, such as pine or cedar. Always take accurate measurements before adjusting the size of the components at the proper size. Drill pilot holes through the components before inserting the wood screws, to prevent the wood from splitting.
Materials
A – 2 pieces of 2×4 lumber – 47 3/4″ long FRAME
B – 1 pieces of 1×4 lumber – 14 1/2″ long, 1 piece – 11″ long, 1 piece – 7 1/2″ long, 1 piece – 4″ long, 8 pieces of 1×1 lumber – 3 1/2″ long SHELVES
C – 9 pieces of 1×6 lumber – 18 1/4″ long BACK
1 piece of 2×4 lumber – 8′
1 piece of 1×4 lumber – 8′
1 piece of 1×1 lumber – 8′
2 pieces of 1×6 lumber – 8′
2 1/2″ screws, 1 5/8″ screws 2″ nails wood filler , wood glue, stain/paint
Tools
Safety gloves, glasses
Miter saw, jigsaw
Chalk line, tape measure, spirit level, carpentry pencil
Drill machinery and drill bits
Time
One Weekend
Building the frame components
The next step of the project is to lock the frame of the corner planter together tightly. Drill pilot holes through the top of the supports and insert 2 1/2″ screws to lock them together tightly. Add glue to the joints and make sure the edges are aligned with attention.
The next step of the project is to attach the 1×6 slats to the back of the frame. Attach the slats to the frame and align the edges with attention. Leave no gaps between the slats and insert 2″ nails to lock them into place tightly. Use a jigsaw / circular saw to make the angle cuts to the slats. Smooth the edges with sandpaper for a professional result.
The next step of the project is to attach the shelves to the frame of the corner planter. Use 1×4 lumber for the shelves and 1×1 lumber for the supports. Use 2″ nails to lock the supports to the frame of the planter and then attach the shelves into place. You can change the angle of the shelves to suit your needs.
This planter is super easy to build and it will add value to your garden. You can easily knock this off using pallet or recycled wood.

No comments:
Post a Comment